The Dodo Blog
You’re an artist too. So, I’m sure you can relate.
We grow, learn new techniques and slowly discover new possibilities as our craft develops. As we lean into the next chapter, some of our earlier work naturally becomes part of an earlier stage of our journey.
For me, that also means creating ...
Have you ever wondered whether your wet felted project is actually finished?
Many felt makers worry about over-felting, but more often than not, the real problem is stopping too early. Under-fulled felt is more likely to pill, lose its shape, and wear out faster.
While your eyes and hands get ...
Today's video is a little different from what I usually do.
I wanted to let you know that I'm taking a short two-week break from publishing new videos. But, before I go, I wanted to share two exciting updates with you.
First, when I return, I'll be starting a brand-new video series all about ...
You know, ... I noticed that offering these two classes together was a mistake.
I thought that people would enjoy having two projects in one class, especially because they’re made with completely different techniques.
Even though these are not the easiest shapes to create, there are several ways t...
I've been thinking about this for a while, and I've finally made a decision.
FELTING CUBIC SHAPES has always included two projects: the nested cubes, and the structured “paper bag”. Two very different challenges, united by the idea that felt can also hold a sharp edge.
But what I've noticed ove...
If you use a sander for wet felting, you're probably placing it on the fiber not longer than 10 to 15 seconds. Am I right?
But have you ever wondered why? And what would actually happen if you left it on for longer?
I had the same question, and so did one of my students. I confess I’ve only bee...
Last week, we had a look at the reasons why a sander can be such a useful tool for wet felting, especially for nuno felting and embellishing with viscose fiber. We also spoke about what to look for when choosing one.
This week, we get into the issue that makes most felt makers nervous: how to pr...
Nervous about mixing water and electricity? I was too!
I've been wet felting for a long time, but it took me until three years ago to finally try working with a sander. And honestly? I wish I hadn't waited so long.
Is it worth it?
Not for every project. But for nuno felting and felting with vi...
Today I'd like to talk to you about my new wet felting program. It's open for registration for another couple of days.
I created it for advanced beginners or intermediate felt makers:
- If you're feeling like you'd like to make progress, but you don't know how
- If you'd like to improve the quality ...
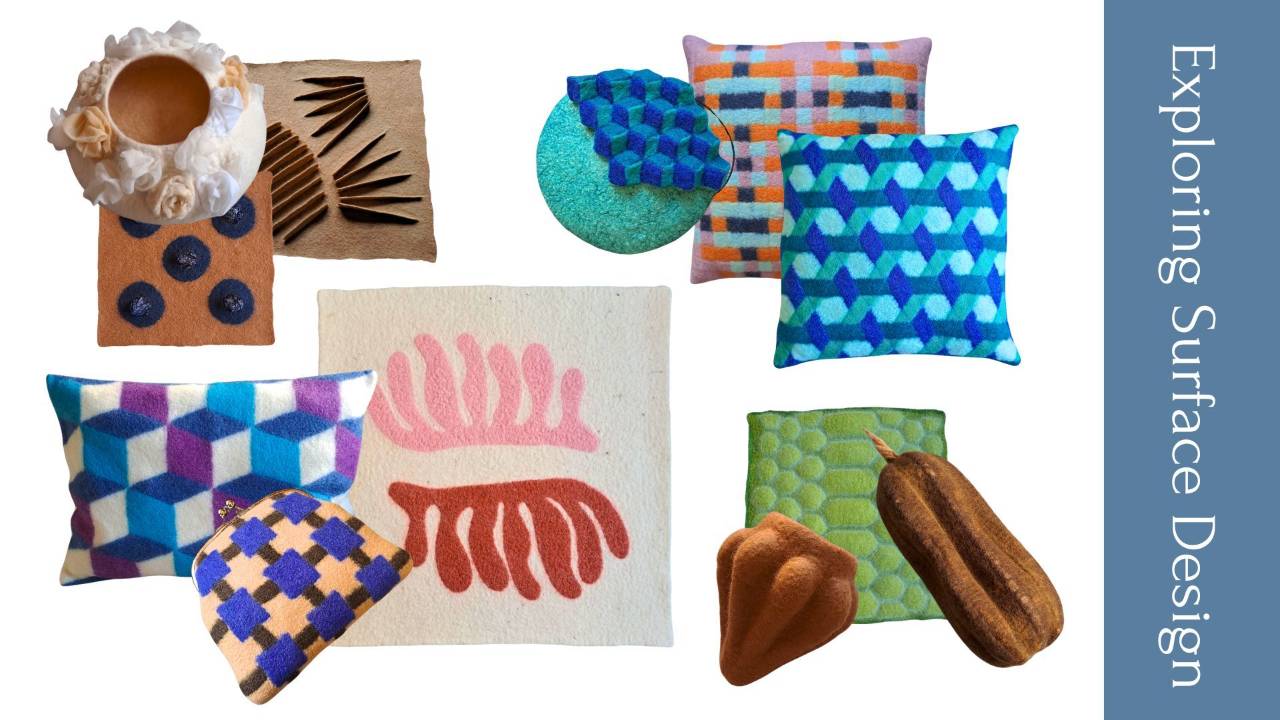
My new online program, Exploring Surface Design, is now open for registration until April 6th.
This program grew out of the evolution of The Dodo Hub into three shorter, more focused trainings. And this one is dedicated entirely to surface design.
If you’ve ever felt that your surfaces could be mo...
In the last couple of weeks, we’ve been talking about pre-felts. Today, I’m continuing this series on pre-felts and I’d like to answer some questions that I got about the topic.
Here are the questions I’m answering in this video:
- I am very curious about pre-felts, especially as a new wet felte ...
Learning to properly work with pre-felts is one of the best things you can do to take your wet felting to the next level, since they can be used for so many things from surface patterns to 3D felt.
Last week we had a look at the differences between handmade and commercial pre-felts. And this week ...
